More efficient prototyping with the GOV.UK prototype kit: step by step (updated January 2024)
I’ve been using the GOV.UK prototype kit since 2016. Over that time I’ve done a few large services (the largest at nearly 200 screens) and a few where I had to do it fast. Over this time I’ve cobbled together my own playbook of efficiency techniques.
This post is aimed at people who have at least started using the GOV.UK prototype kit. If you haven’t started using it, I suggest the excellent Get Started guide on the GOV.UK prototype kit site.
Disclaimer: I’m a self-taught coder, and aside from about 6 months have never worked on a team with a front-end developer, so my methods may not be the most efficient. They do work for me in terms of streamlining efficiency while allowing for a lot of flexibility. Others probably do it in different ways, and I may do some things in an overly roundabout way (happy to be told if there is some code I can cut down!).
**Update January 2024: some tricks I used are no longer supported. I've updated the guidance to make it work with recent versions of the prototype kit. Thanks Joe Lanman for picking up where a few of my updates still didn't work! **
1. Make it easy to check what you’re doing
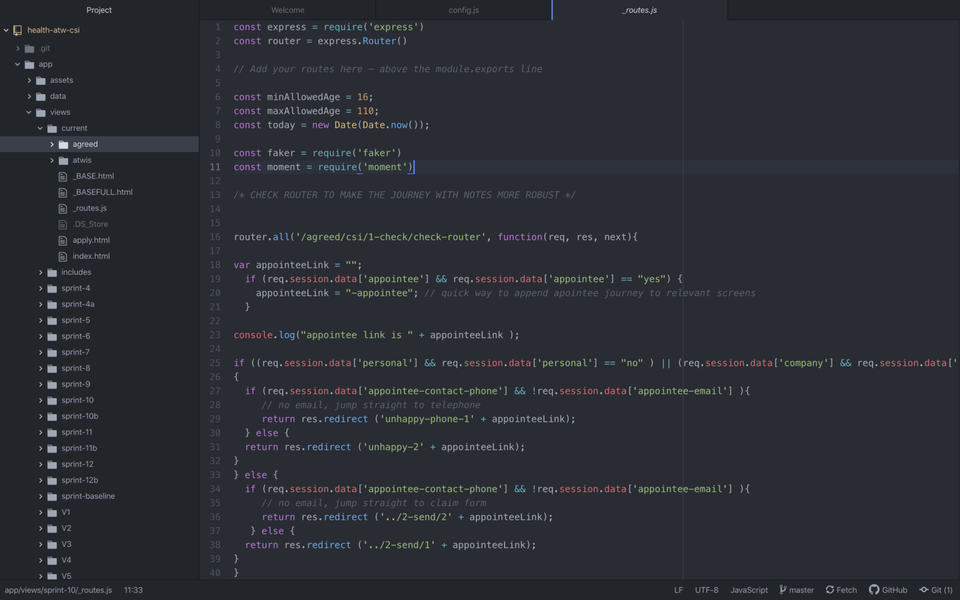
The first thing I do on any prototype I either start or inherit is a trick I learned from Craig Abbott. Making some code changes means that I can see on the prototype every part of session data that has been saved. This has been a lifesaver when I can’t figure out why something isn’t working — often it’s because I labelled something incorrectly!
In app/views/routes.js look for
// Add your routes here - above the module.exports line
and add before module.exports = router
// Logging session data

  router.use((req, res, next) => {
      const log = {
        method: req.method,
        url: req.originalUrl,
        data: req.session.data
      }
      console.log(JSON.stringify(log, null, 2))

    next()
  })
Now whenever you have your prototype open, you can see all saved data in the terminal!
I also like to see what page I’m on and where I came from to check that redirects are happening as expected.
Add straight after the previous code
// GET SPRINT NAME - useful for relative templates
router.use('/', (req, res, next) => {
  res.locals.currentURL = req.originalUrl; //current screen
  res.locals.prevURL = req.get('Referrer'); // previous screen

console.log('folder : ' + res.locals.folder + ', subfolder : ' + res.locals.subfolder  );

  next();
});
You’ll now see whenever you’re on a page what the current URL is and the previous URL. We’ll also build on this later on for ringfencing iterations.
2. Template all common layouts
At the start of any project I like to create some layouts for common pages:
- a holder for the service
- screens that aren’t part of the service but we have some influence over (for example, guidance pages, email notifications, or SMS messages)
- any other common journeys (for example, search)
As part of this, I’ll create custom blocks that include the areas that I want to change. For example, for the main content in a service page, the block might be the name of the service.
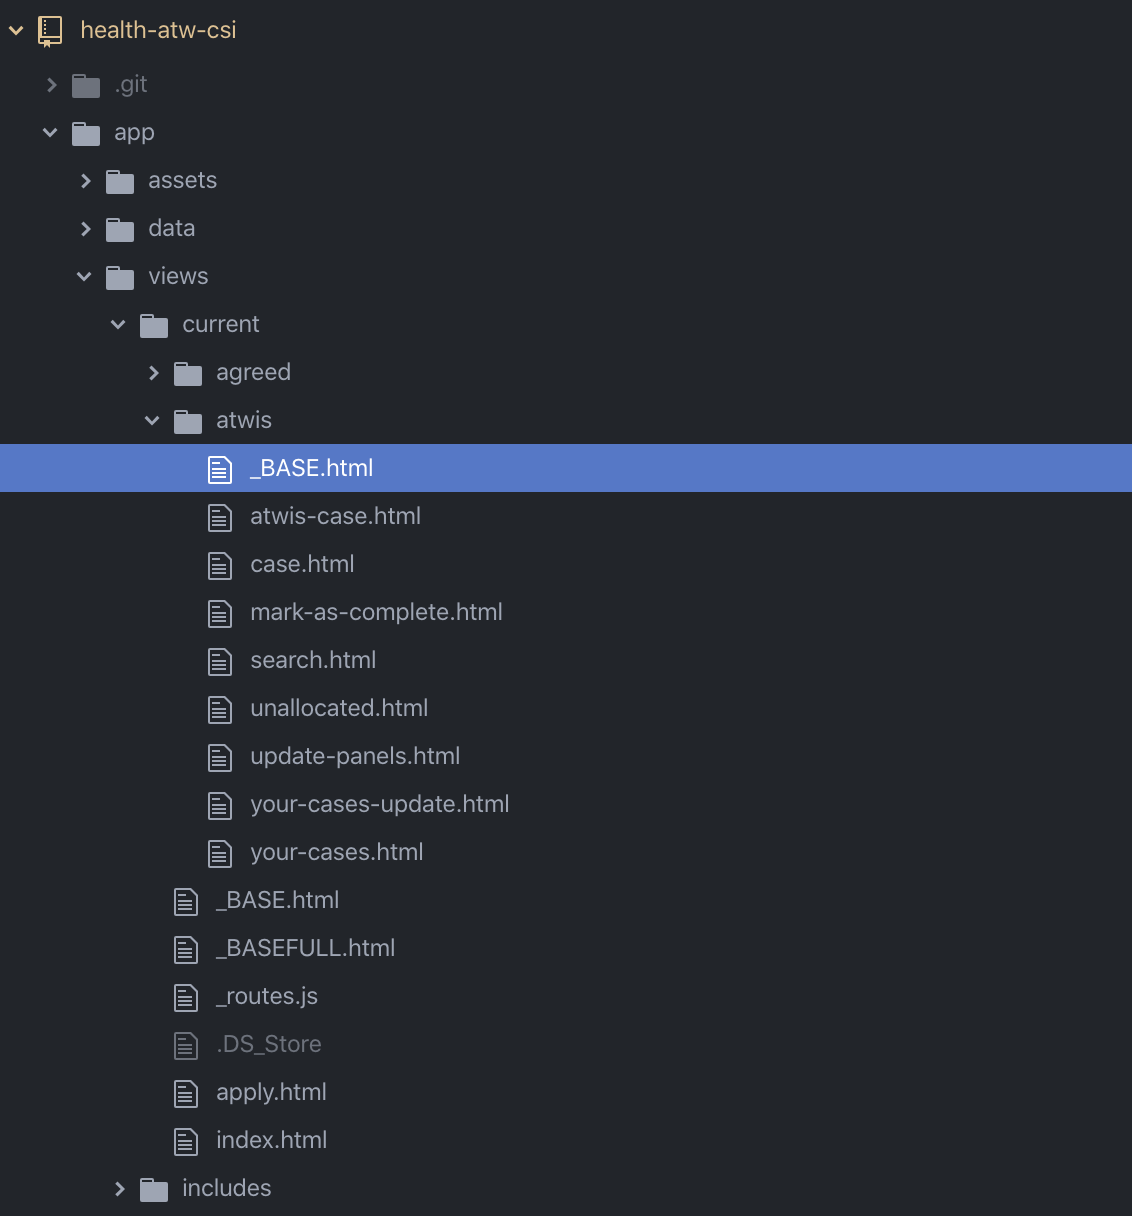
In the layouts folder I might then make a file called _BASE.html. (I use an underscore and caps to make it clear that it’s a template. You can also use the nunjucks format .njk, but I lose all coloured formatting when editing the file on Atom so prefer html. Hey, I’m a designer).
As part of this I’ll also create a custom block (place where content can go). Here it’s inside the existing block content that I’ve added one called service.
{% set serviceName = "This cool service" %}

{% extends "layouts/\main.html" %}


<!-- add elements that we want consistently across the service -->

{% block pageTitle %}{{title}} - {{serviceName}} - GOV.UK{% endblock %} {% block header %}

{% include "includes/cookie-banner.html" %}

{{ govukHeader({    homepageUrl: "/",    serviceName: serviceName,    serviceUrl: "/",    containerClasses: "govuk-width-container"  }) }} {% endblock %}
{% block beforeContent %}

{{ govukPhaseBanner({  tag: {    text: "beta"  },  html: 'This is a new service – your <a class="govuk-link" href="#">feedback</a> will help us to improve it.'}) }}

<a class="govuk-back-link" onclick="history.back();" >Back</a>

{% block content %}

<div class="govuk-grid-row">
<div class="govuk-grid-column-two-thirds">

<!-- start of service specific block -->

{% block service %}Text goes here, override this by overriding the block{% endblock %}

<!-- end service specific block-->

</div>

<div class="govuk-grid-column-one-third">
<div id="ad-helpline"> <p class="govuk-heading-m">Get help</p>  <p class="govuk-heading-s">Telephone</p>  <p class="govuk-body">0800 169 0154</p>  <p class="govuk-body">Monday to Friday, 8am to 6pm</p>  <p class="govuk-body">Closed public holidays</p>

</div>
</div></div>
{% endblock %}
Then, I can use this on a child page, to save a lot of repeat code.
{% extends "layouts/\_BASE.html" %}


{% block service %}


<form id="form" method="post" action="dob-router">

<div class="govuk-form-group">

{{ govukDateInput({   id: "passport-issued",   namePrefix: "passport-issued",   fieldset: {     legend: {       text: "When was your passport issued?",       isPageHeading: true,       classes: "govuk-fieldset\_\_legend--xl"     }},   hint: {     text: "For example, 12 11 2007"   } }) }}

<input type="submit" class="govuk-button" value="Continue" id="submit"> </form>

{% endblock %}
3. Separate input from presentation (filters)
Money and dates are a couple of data types where what gets typed in is different from what is displayed back. Money and calendar dates are typed in as input, but played back transformed (1 becomes £1, 1 4 2018 becomes 1 April 2018).
For these, nunjucks has filters. Go to filters.js and add these lines:
filters.toMonth = function(x){

months = ["January", "February", "March", "April", "May", "June", "July", "August", "September", "October", "November", "December"];

if (x > 0){ return months[x - 1]; // returns date as per month
} else {
        return x ;
}}

filters.toMoney = function(x){  return("£" + x );

//TO ADD - case to handle nothing being there
}
you can then use them on a page to modify what’s shown using nunjucks and the pipe | symbol:
{{data['dob-day']}} {{data['dob-month'] | toMonth }}{{data['dob-year']}}
In general, I think that filters aren’t used as much as they could be. There are some nice built in ones, such as changing sentence cases (useful for data variables that become the start of a sentence).
As an extra note, there is a very useful filter if you’re trying to pass data to aa macro or similar and it’s not showing up — safe . Use it as follows:
data\['more-detail-4'] | safe
4. Make reusable components as you go (make a macro)
When I know that I’ll be using something a lot and need to put data into it, I’ll make a macro on the page using nunjucks. This way I can keep things consistent and use data to show conditions. For example, a service I’m working on uses the task list pattern. As there’s no macro for it, I’ve made my own (in our service users can only work on one task at a time).
I’ve defined some areas to add detail to:
title(the name of the task)link(what the title should link to)completed(when we should show that a task is complete)cantStart(when a section can’t be started)
Nunjucks is based on a python like language so note the use of not statements
{% macro taskListItem(title="'title'", link='#', completed='', cantStart='' ) %}

<li class="app-task-list\_\_item"><span class="app-task-list\_\_task-name">

{% if not (cantStart or completed)  %}

<a href="{{link}}" aria-describedby="eligibility-completed"> {% endif %}      {{title}}

{% if not (cantStart or completed)  %}
</a>{% endif %}  </span>{% if completed %}<strong class="govuk-tag app-task-list\_\_task-completed" id="eligibility-completed">Completed</strong>
{% else %}
{% endif %}
</li>
{% endmacro %}
I can then use it on the page to quickly add both the tasks but the conditions to decide what state the task item is in:
<ol class="app-task-list"><li>
<h2 class="app-task-list\_\_section">Check and approve</h2>

<ul class="app-task-list\_\_items" style="padding-left: 0">

{{taskListItem(title="Find applicant on Searchlight", link="1-check/1", completed=(data['searchlight'] == "yes" or data['ni-number'] ), cantStart="")}}

{{taskListItem(title="Add National Insurance number", link="1-check/1-ni-number", completed=(data['ni-number'] ), cantStart=(not (data['searchlight'] == "yes") ))}}

{{taskListItem(title="Check for appointee", link="1-check/2", completed=(data['appointee'] ), cantStart=(not data['ni-number'] ) )}}

{{taskListItem(title="Check application", link="1-check/3", completed=((data['interview'] == 'yes' and data['company'] == 'yes' and data['personal'] == 'yes' ) ), cantStart=(not data['appointee'] ) )}}

</ul></li></ol>
5. Consider the complexity of form logic (simple branching vs router redirects)
One of the fastest ways to make a prototype feel real is have branching. When branches are simple (for example, yes goes one way and no goes another), I like to build this into the prototype.
Simple branching
I’ve done this in different ways over the years (using the values, some bespoke code a front-end developer wrote, and more recently with jQuery).
For new people, I’d recommend using Craig Abbott’s radio-button-redirect plugin. His instructions are really clear too.
Complex branching
For complex branching I send the form to a page that doesn’t exist (I always call it -router
Then in the related routes file I’ll redirect them. Here are a couple of examples of slightly more complicated redirection.
This one requires 2 radio buttons to be selected as yes. I check both that there’s a value and that the value is ‘yes’ as I’ve found express to throw an error if I go to check for a value when the variable is undefined
//routing for check evidence screen
router.all('/agreed/csi/5-payments/check-evidence-router', function(req, res, next){

console.log( "claim form is " + req.session.data['claim-form-signed'] + " and invoice is " + req.session.data['invoice-checked'] );

//IF all answers are 'yes' get re-directed to 'check invoice screen' ELSE IF get re-directed down the unhappy path
 if ( (req.session.data['claim-form'] && req.session.data['claim-form'] == "yes") && (req.session.data['signed-claim-form'] && req.session.data['signed-claim-form'] == "yes") && (req.session.data['invoice'] && req.session.data['invoice'] == "yes") ) {
 return res.redirect ('2');
next();
}
 else { // there's something missing
  return res.redirect('1-unhappy');
  next();
}
next();
});
This is one where the value is based on a number amount
//router that manages support cost being confirmed. This will hand off to the unhappy path if the cost is not matching or is incorrect

router.all('/agreed/csi/5-payments/confirm-router', function(req, res, next){

//|| !req.session.data['invoice-value'] || isNaN(req.session.data['invoice-value']

if ((req.session.data['invoice-value'] <= 200 )) {
  return res.redirect ('4');
next();
}

// otherwise there's a discrepancy so go to 'unhappy page'
else  {
  return res.redirect ('3-unhappy');
next();
}

next();

});
6. Ringfence iterations (/current folder and past versions)
I always work in a folder called current as this stops confusion about sprint versions and BAs having to change links in the prototype.
I do have a system for good ringfencing of versions and related functionality.
The first time I make the current folder I add a file called _routes.js and add this to the file.
const express = require('express')
const router = express.Router()

// Add your routes here - above the module.exports line

module.exports = router
I then go toapp/views/routes.js and add this functionality at the very bottom, just before module.exports = router (and after any other stuff previously added)
// Start folder specific routes

// current sprint, remember to add older sprint when adding a new folder!
router.use('/current', require('./views/current/\_routes'));
Then when I want to start a new sprint, I’ll duplicate the current folder and then put a link in app/views/routes.js to make sure all the logic in the old folder still works
// Start folder specific routes
router.use('/sprint-1', require('./views/sprint-1/\_routes'));
// current sprint, remember to add older sprint when adding a new folder!
router.use('/current', require('./views/current/\_routes'));
This means that all logic for an iteration can be done in the related _routes folder rather than interfering with all other folders, for example
const express = require('express')
const router = express.Router()

// Add your routes here - above the module.exports line

//IF all answers are 'yes' get re-directed to 'check invoice screen' ELSE IF get re-directed down the unhappy path
 if ( (req.session.data['invoice'] && req.session.data['invoice'] == "yes" ) ){
 return res.redirect ('2');
next();
}
 else { // there's something missing
  return res.redirect('1-unhappy');
  next();
}
next();
});

module.exports = router
I also do one other important thing for templates.
Nunjucks doesn’t do relative linking well. Because of this, if I want to have base templates in each iteration that I can change, I have to set up variables for nunjucks to find them. I do it this way.
Go back to that GET SPRINT NAME functionality in app/views/routes.js
Change it to be
// GET SPRINT NAME - useful for relative templates
router.use('/', (req, res, next) => {
  res.locals.currentURL = req.originalUrl; //current screen
  res.locals.prevURL = req.get('Referrer'); // previous screen
  req.folder = req.originalUrl.split('/')[1]; //folder, e.g. 'current'
  req.subfolder = req.originalUrl.split('/')[2]; //sub-folder e.g. 'service'
  res.locals.folder = req.folder; // what folder the url is
  res.locals.subfolder = req.subfolder; // what subfolder the URL is in

console.log('folder : ' + res.locals.folder + ', subfolder : ' + res.locals.subfolder  );
  console.log('previous page is: ' + res.locals.prevURL + " and current page is " + req.url + " " + res.locals.currentURL );
  next();
});
You can now use these relative links to point to stuff. For example in your layouts/_BASE.html file that you created earlier, you can change
{{ govukHeader({ homepageUrl: "/" , serviceName: serviceName, serviceUrl: "/", containerClasses: "govuk-width-container" }) }} {% endblock %}
to
{{ govukHeader({ homepageUrl: "/" + folder + "/", serviceName: serviceName, serviceUrl: "/", containerClasses: "govuk-width-container" }) }} {% endblock %} <!-- homepage header will always link to top level of that iteration, for example 'current' -->
I also use this a lot by having a base folders in my iteration folders and then linking to them in ways like this
{% extends folder + "/" + subfolder + "/csi/\_CSIQUESTION.html" %}
You can see in an example below how I use a lot of _BASE and similar folders as templates (there are even more in other folders)
7. Set defaults as needed
With nunjucks it’s possible to set defaults in one of two ways:
- on a field by field level
- By setting variables on a page
I use the default option a lot on fields, for example showing a name even if we jump straight to a page rather than inputting it. In this situation I’d do something like this:
{{data['full-name'] | default("John Smith") }} // shows John Smith if 'full-name' is not defined
If it’s on a page I’m using multiple times (for example where I might have slightly different working on a title for if an applicant has an appointee or not) I might set it this way:
{% if resend %}
{% set link = "index" %}
{% set resend = "-resend" %}
{% set title =  "Print and send the claim form again" %}

{% else %}
{% set link = "../index" %}
{% set resend = "" %}
{% set title =  "Print and send the claim form" %}
Further reading (and experimenting)
- Express.js guidance. I used this a lot for learning about how express worked — it was more useful than some of the books I bought to be honest
- Nunjucks templating guide. I learned most of the filtering and macro information from here. The guide also mentions that Nunjucks is a port of an older framework Jinja2, so their guidance also has some extra information.
- GOV.UK prototype kit tutorials and examples. A lot of this information used to only be shared in the training sessions, so it’s great that it’s available now.
- The latest prototype I was working on (as of March 2020). After many years working in a government department where our prototypes had to be private, I’m happy to have an open repository that people can have a look at. It doesn’t use the simple redirection as mentioned in this post, but most of the other principles are here.
- Stack Overflow. Not gonna lie, used this a lot!
Member discussion